Observing the wonders of nature with a spotting scope or telescope is fun and exciting, but taking a picture of what you see through these optics allows you to enjoy it over and over again. Astrophotography with a telescope, whether reflector, refractor, Maksutov or Schmidt-Cassegrain, is often a simple matter of adding an SLR or CCD camera to the telescope with the appropriate adapters . You can even view images on a TV or smartphone by using an electronic eyepiece. For many spotting scopes, adding an SLR camera is just a matter of an adapter and the appropriate T-ring. Currently, however, the most popular form of photography with a spotting scope is digiscoping.![]()
Astrophotography Needs
Astrophotography Telescopes
You will need a motorized or GOTO mount to keep objects in the eyepiece during the long exposures required in astrophotography. This type of mount provides the necessary tracking accuracy; without it, even a single hesitation or misstep in tracking over a period of many minutes can result in a blurred image. That's why serious astrophotographers value highly precise and accurate motorized mounts. Simply put, if you want to do more than take low power shots of very bright objects such as the moon, you will need a good motorized or GOTO mount.
The preferred type of mount for astrophotography has traditionally been the motorized equatorial mount or computerized equatorial mount. This type of mount eliminates something called field rotation. Field rotation is the blurring at the edges of a picture that occurs with mounts which move the telescope both horizontally and vertically to follow an object, rather than in one smooth continuous arc or curve like an equatorial. You can, however, add an accessory called a "wedge" or a "field de-rotator" to other types of mounts to duplicate the movement of an equatorial mount. In fact, if you use a CCD camera, exposure times are sometimes so short that field rotation may not be a problem.
SLR Camera or CCD Image Sensor
These cameras have the necessary sensitivity to record faint objects, and they also have the capability to acquire images over long exposure times, which adds up to many minutes. Digital point-and-shoot cameras typically shut off after a period of several seconds, making them totally unsuitable for this kind of work. Unless you want to limit yourself to shots of very bright objects such as the moon at low magnifications, you will need a CCD (charge-coupled device) imager or SLR camera. Once you have the correct mount, you have a choice of several techniques for attaching a camera to a telescope.
Prime Focus Photography
In prime focus photography, you attach an SLR camera body directly to the telescope. No telescope eyepiece or camera lens is used. The telescope then becomes a giant telephoto camera lens. The advantage of this type of astrophotography is that magnifications are relatively low, so image brightness is high and exposures times are minimal. This is the preferred way to take pictures of faint deep-sky objects, which are the most popular targets for astrophotography. Short focal length telescopes excel here because they require shorter exposure times than long focal length telescopes. In photographic terms, these are "fast" lens systems. Long focal length telescope designs such as Schmidt-Cassegrain are easily converted to shorter focal lengths by adding an accessory called a focal reducer.
Increasing Magnification for Astrophotography
More magnification is typically needed to get good pics of the planets, moon, and some of the smaller deep-sky objects. Long focal length telescopes, such as Schmidt-Cassegrains and Maksutovs, are in their element here because longer focal lengths translate into more magnification. A popular trick to increase focal length and magnification on any telescope is to place a barlow lens in the telescope before adding the camera adapter and camera. A 2x barlow lens doubles the focal length and magnification of any telescope.
If adding a barlow lens still doesn't produce enough magnification, there is always eyepiece projection. In eyepiece projection, the camera takes a picture of the image in the telescope eyepiece. In theory, it's just a matter of using the right eyepiece that delivers the desired magnification, assuming, of course, that your scope and observation conditions can deliver a high-quality image at that magnification. In practice, though, this type of astrophotography can be very challenging. High magnification typically increases exposure times and more importantly, makes tracking much more critical. Even the slightest tracking error at high magnification will result in ruined exposure. Patience and determination are critical.
CCD Imagers for Beginners
If you are a beginner, you might want to take a look at CCD image sensors if you don't already have a camera. CCD imagers have changed the face of astrophotography. These are correctly called "imagers" rather than "cameras" because they cannot store images like a camera can. Instead, CCD imagers deliver images directly to a computer, and the computer captures, stores, and processes the images. Obviously, you need access to a computer with this type of astrophotography. CCD imaging offers many advantages though. On top of all the digital advantages, you also get something called "stacking". In stacking, the CCD imager takes a series of snapshots and the computer then stacks the images one on top of the next. The beauty of stacking is that tracking accuracy is far less critical. The computer can compensate for tracking errors that would ruin a shot with an SLR. Exposures times are also typically much shorter with a CCD imager. Astrophotography has never been easier thanks to CCD image sensors, and many of these are now more affordable than a digital SLR camera.

Digiscoping is simply a matter of taking a picture of the image in the eyepiece of a spotting scope with a small digital point-and-shoot camera. Most expensive spotting scopes offer some form of digital adapter for digiscoping, but even more affordable spotting scopes are now compatible with digiscoping adapters as interest in this simple and inexpensive form of photography continues to grow.

What Are the Basics of Digiscoping?
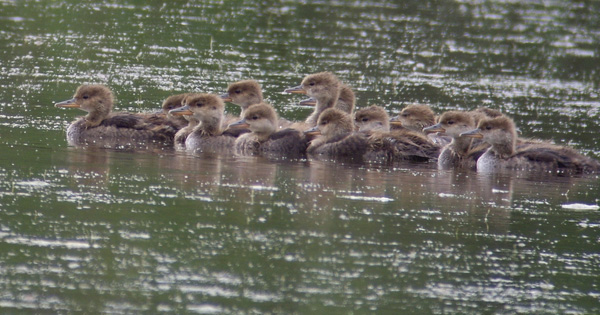
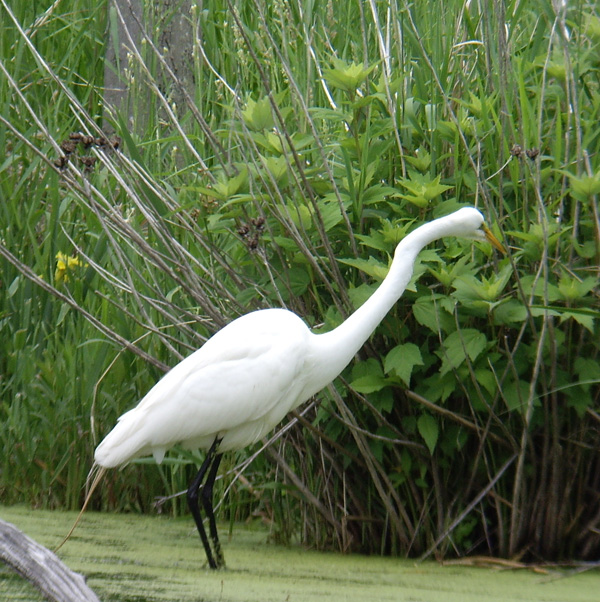
Digiscoping is one of the simplest, yet most effective methods of taking high magnification pictures. Digiscoping began when someone decided to hold a compact camera over the eyepiece of a spotting scope and take a picture of the image in the eyepiece. The results amazed everyone. It was now possible to take good quality pictures at higher magnifications than ever before and do it with relatively inexpensive camera equipment.
Later, to make aligning the camera a quicker and more precise process, adapters were developed to attach the camera to the spotting scope lens. The first adapters attached the camera directly to the eyepiece of the spotting scope by means of filter threads around the camera lens. At the time, most digital point-and-shoot cameras (small digital cameras that don't have a removable lens) were equipped with these threads to hold filters and other accessories. All you had to do was find the adapter that matched your spotting scope eyepiece and the thread size of your camera. This was sometimes tricky, and the correct adapter was often hard to find.
Universal Adapters for Digiscoping
In the past few years, digital compact cameras have begun to shrink. Many, if not most, do not have filter threads, so new ways of attaching a camera to the spotting scope have been developed. These new adapters are called universal adapters because they allow you to use any digital point-and-shoot camera and attach it to virtually any spotting scope. Universal adapters don't thread to the eyepiece of the spotting scope or the lens of the camera. Instead, a universal adapter simply holds the camera over the eyepiece. This has greatly simplified getting an adapter and has opened up digiscoping to more people than ever before.
These universal adapters are one of two types. The first is simply a bracket. One end clamps over the eyepiece of the spotting scope, while the other end is an adjustable platform with a tripod stud. The camera attaches to the platform and is adjusted to the correct distance from the eyepiece. These bracket-style universal adapters are relatively inexpensive.
For digital SLR cameras or larger digital point-and-shoot cameras, you will need something a bit sturdier. This is the second style of universal adapter. This universal adapter holds both the spotting scope and camera, so the weight of a heavy camera is not supported strictly by the spotting scope eyepiece. This provides a more stable system.
Keep one thing in mind here - a digiscoping adapter has no optical function. The only thing a digiscoping adapter does is hold the camera over the spotting scope eyepiece.
When choosing an adapter, you will most likely be choosing an adapter that holds the camera over the eyepiece with a platform just like a tripod head, rather than an adapter which attaches the camera to the spotting scope with threads. In other words, threaded digiscoping adapters are all but obsolete. Why? It's simple. With very few exceptions, today's small digital point-and-shoot cameras don't have filter threads, so you cannot use an adapter that attaches the camera to the spotting scope with threads. How can you check to see if your camera has threads? If the camera lens extends out from the body when you turn it on - and that includes 95% + of all small digitals - it does not have filter threads. No need to worry about the camera lens hitting the eyepiece of the spotting scope because all universal digiscoping adapters are adjustable. Simply zoom the camera lens out to its maximum lens length and adjust the adapter to get the right distance.
Requirements for Digiscoping
Like all things digital, digiscoping - taking pictures through the eyepiece of a spotting scope with a small digital camera - keeps evolving. Much of the change centers around the constant upgrading of today's digital compact cameras. For digiscoping, the improvements in lens quality, image processing, and the addition of image stabilization make today's digital point-and-shoot cameras better than ever when placed behind the eyepiece of a good spotting scope.
What do you need to start digiscoping in the current marketplace of digital cameras and spotting scopes? The answer is actually quite simple. That much has not changed. You need:
- A good spotting scope
- A good digital camera
- An adapter or other means to attach your camera to your spotting scope.
Digiscoping Spotting Scope
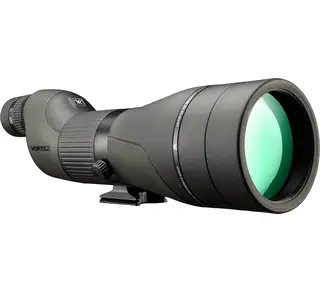
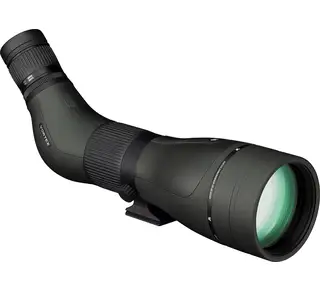
The basics have not changed when selecting a spotting scope for digiscoping. Keep one digiscoping principle foremost in your mind - the main factor, by far, in picture quality while digiscoping is the optical quality of the spotting scope. The camera is actually a distant second in this regard, so put your money into the spotting scope first. Digiscoping is no different than any other type of photography when it comes to picture quality - it's all about the camera lens, and in digiscoping, the spotting scope IS your camera lens.
What makes a good spotting scope for digiscoping? The best feature to look for in a spotting scope for digiscoping is a high-grade objective lens with special, high-performance optical glass - ED, HD, XD, APO, fluorite, and so on. Just as with camera lenses, an ED (extra-low dispersion) or other high-performance glass objective will produce the sharpest pics with the best color and resolution. These special glass versions of spotting scopes produce the best images at high magnifications visually and at ALL magnifications photographically. Yes, special-glass objective spotting scopes are expensive, but they are a digiscoper's dream. For digiscoping, it is better to choose a small spotting scope with an ED or other special glass objective than a large spotting scope with a standard glass objective.
Spotting Scope Eyepiece for Digiscoping
Next consideration in a spotting scope for digiscoping is the spotting scope eyepiece. Remember, the eyepiece in a spotting scope is only half of the optical system. The eyepiece is an important consideration for both visual use and for digiscoping. For visual use, a zoom spotting eyepiece is the most popular and versatile eyepiece choice and, yes, a zoom eyepiece can be used for digiscoping. The best eyepieces for digiscoping, though, are fixed-power, wide-angle eyepieces with long eye relief. Why? Fixed-power, wide-angle spotting scope eyepieces usually have wider lens elements than zoom eyepieces, and fixed-power eyepieces typically offer more eye relief than zoom eyepieces. This makes camera placement behind the eyepiece less critical with a fixed-power eyepiece, but more importantly, it also means a fixed power eyepiece produces less vignetting (darkening at the edge of the frame in your pic) than a typical zoom eyepiece. Some zoom eyepieces, especially cheap ones, produce so much vignetting that we end up with a round frame pic, rather than the usual rectangular pic we are used to seeing on our camera. This is sometimes called "portholing", since it is similar to viewing the world through the porthole of a ship.
Fixed Power Eyepiece Options
The bad news is that you typically don't get the option of fixed-power eyepieces on lower and mid-priced spotting scopes. To get the option of fixed-power, wide-angle eyepieces, you usually have to move up to more expensive spotting scopes. Really no choice, though, if you want this fixed-power eyepiece option. With very few exceptions, spotting scope eyepieces are not interchangeable between brands or even between models within the same brand. The good news is that you can always crop any pic, even a porthole shaped pic, in your computer software once you download the pic into your computer, but getting a full-frame pic in the first place gives you much more flexibility when editing. (Hint: when choosing a fixed power eyepiece, keep magnification around 20x or 30x. When you factor in the optical zoom on the camera with these magnifications, you have all the magnification you will ever need.)
How to Buy the Best Spotting Scope for the Money
Okay, say you don't have the budget for a high-grade spotting scope. Now what? With spotting scopes, optical quality is very directly related to price, so buy the best spotting scope you can afford. You don't need a lot of magnification or even a large objective lens, just the best optical quality, and that will be reflected in the price. If a small scope and a large scope are priced the same, which do you think will have the best optical quality? Right, the smaller scope at the same price. If you cannot afford a model that offers fixed-power eyepieces as an option, you are stuck with a zoom eyepiece, but not all zoom eyepieces are created equal for digiscoping. For digiscoping, at least try to find a model with 15mm of eye relief or more. That will produce less vignetting and portholing in your pics.
Image Stabilized Digital Point and Shoot Cameras
Things continue to evolve in digiscoping with the appearance of image-stabilized digital point-and-shoot cameras. This has brought digiscoping full circle. It is now possible to hand hold one of these new image stabilized (shake reduction) models such as the Pentax Optio A10 8.0 MP Digital Camera over the eyepiece of a spotting scope or even a binocular or monocular without an adapter at all and get excellent results. It does take practice and a little patience, but if you want simplicity, there is nothing like pulling one of these digital compact cameras out of your pocket and taking a pic of whatever is framed in the eyepiece of your spotting scope or binocular. No bracket or adapter needed.
Digiscoping Digital Cameras
It may seem to go against everything you've learned or heard about cameras, but the best cameras for digiscoping are small cameras with small lenses. The key is small lenses. Small lenses are a much better match for spotting scope eyepieces and produce much less vignetting than large camera lenses. Not only that, small digital cameras are much easier to use and handle when digiscoping. Large digital cameras with high zoom ranges and SLR cameras (cameras with removable lenses) produce a lot of vignetting when placed behind a spotting scope eyepiece. These large cameras also create clearance problems with many digital adapters, and they also produce some serious weight and balance issues when added to a spotting scope. Who needs the hassle, especially when any decent quality, small digital camera will do a great job?
When digiscoping, keep the camera small. How do you know when you have a small digital point-and-shoot camera? If the camera offers up to 3x or 4x optical zoom, but no more, it is likely to have a small enough lens for digiscoping. If it offers more optical (digital doesn't count) zoom than 3x or 4x, it is likely to have a larger lens and therefore, be a poor choice for digiscoping. Besides, when you factor in 3x optical zoom on the camera lens to the magnification on the spotting scope eyepiece, you already have more magnification than you will probably ever need.
Other Helpful Camera Features for Digiscoping
For digiscoping, there are a couple of other helpful features in a digital camera to be used for digiscoping. One is a large, easy to see LCD screen. The good news is that most of today's digital cameras are better than ever in this regard, with 2in and 2.5in screens being almost standard. Another very helpful feature is image stabilization, which is now a feature found on many good digital cameras. An image stabilized digital camera allows you to depress the shutter button with a minimum of vibration to the camera. This means you can leave the remote switch at home - one less thing to mess with in the field. In fact, some of us diehard digiscopers are even forgoing the use of a digiscoping adapter when using an image stabilized digital camera. We simply hold the image stabilized camera over the eyepiece by hand and fire away. It takes some patience and practice to hold the camera over the eyepiece of a spotting scope without the aid of an adapter, but it is the ultimate in convenience and portability.
Digital Camera Megapixel Amount
How about camera megapixels (MP)? Relax - that is an over-hyped digital camera feature and most digitals these days have 8MP and more. Even 8MP is more than you will ever need for digiscoping. In fact, I have taken some of my best shots with half that, so don't lose sleep over the difference between, say, an 8MP model and a 10MP model. Even this much resolution is going to be wasted unless you plan to make and print insane enlargements and, if so, your printer's resolution is more likely to be the limiting factor. Let's face it, most digiscopers simply trade pics via emails and/or view them on computer monitors. Screen resolution on your monitor, not pic resolution, becomes the limiting factor, then. Bottom line: Do not buy a camera based soley on its MP count. Lens quality, image processing, color saturation, and so on are far more important. When in doubt, go online and check reviews. If that doesn't work for you, just stay with one of the major models from the big names and you'll be fine for digiscoping.
Platform Adapters
As far as platform adapters, you have two choices. You can go with one of the many bracket-style universal adapters, which clamp onto the spotting scope in the vicinity of the eyepiece or you can go with a universal rail style adapter, such as the Alpen 706, which holds both the spotting scope and the camera. I prefer rail-style adapters, rather than bracket-style adapters, despite the larger size and bulk of rail adapters. For one, rail adapters do not interfere with the zoom ring on the spotting scope eyepiece or the focusing knob on the spotting scope - problems you may encounter with some bracket-style adapters and scope combinations. For another, rail-style adapters often offer a swing away function, which allows you to pivot the camera over the eyepiece for pics, than out of the way so you can use the scope visually. This is a great time saver and very convenient when you are using your spotting scope for both visual use and digiscoping, as I do when birding.
Lastly, you do not need to worry about an adapter that supplies a cover to keep lateral light off the eyepiece of the scope when digiscoping. I have taken literally thousands of shots by simply holding a camera over the eyepiece without any adapter or shield at all, and light sneaking in from the side of the camera has never been an issue. If it makes you more comfortable, use a cardboard tube if you want a shield. After all, improvising with materials at hand is in the true spirit of digiscoping. That's the way it all began.